Cascading Style Sheets
Using CSS controls
The RiverDocs converter has controls to enable you to make the most of Cascading Style Sheets (CSS).
There are a number of options for CSS generation and output, and a comprehensive range of editing tools.
Formatting Display Properties
The RiverDocs Converter separates presentational features of documents from the content and structure to help ensure accessibility. The software separates the content from its presentational features by using Cascading Style Sheets (CSS).
When you publish a document, the output folder contains a file, usually called master.html.css. The .css file extension indicates that it is a Cascading Style Sheet (CSS).
This contains all the style and formatting information extracted during the conversion process, or subsequent editing.
You have two main options for changing the presentational features of a converted document. You can either replace the RiverDocs stylesheet or you can edit the styles within it.
RiverDocs-generated CSS
By default, the Converter automatically generates a new stylesheet for every document converted. The benefits of this are
- Document portability: The entire converted document, including images and stylesheet, can be moved as a single folder, and will work in any location on the Web.
- The CSS styles will closely reflect the print characteristics of the source document, without presenting any additional accessibility barrier.
If you allow the Converter to generate a stylesheet for your document, you can extend or edit it using the CSS controls in the Editing pane. Your changes will become part of the converted output when you save using Save or Publish.
Replacing the Stylesheet
You may wish to use an existing stylesheet, e.g. one used as a standard for an organisation, rather than one generated by RiverDocs. You can import any style sheet into the Converter as follows:
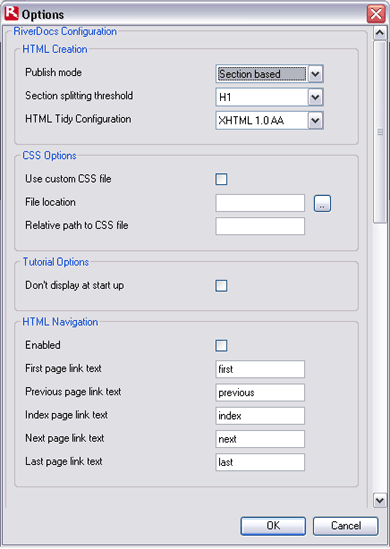
- Before converting, your document, click the Options button in the main toolbar.
The Options dialogue box is displayed, containing the RiverDocs Configuration options. - In the CSS Options section,
- Tick the Use custom CSS file checkbox
- Use the File location browse button to locate and select the existing stylesheet CSS file that you want to apply to converted documents.
- Next, in the Relative path to CSS file text box, enter the relative path for the site where the document will be published.
- The relative path will normally be in the form \mysite\mycss.css
- The Converter will add this path to all the output pages, in the form
Then any changes made to the site’s CSS file will be applied automatically to the document.<link rel="stylesheet" type="text/css" href="..\mysite\mycss.css"/>

Applying styles from custom CSS
- Select text you wish to apply a custom setting to.
- Click the down arrow of the Formatting and Style of selection drop-down list and select an element from your custom style sheet to apply.
Editing selected text
You can change font formatting characteristics via CSS Styles or using the Editing toolbar.
With lists, especially those containing more than one font per list item, it is recommended that you change only one list item at a time.
Editing via CSS
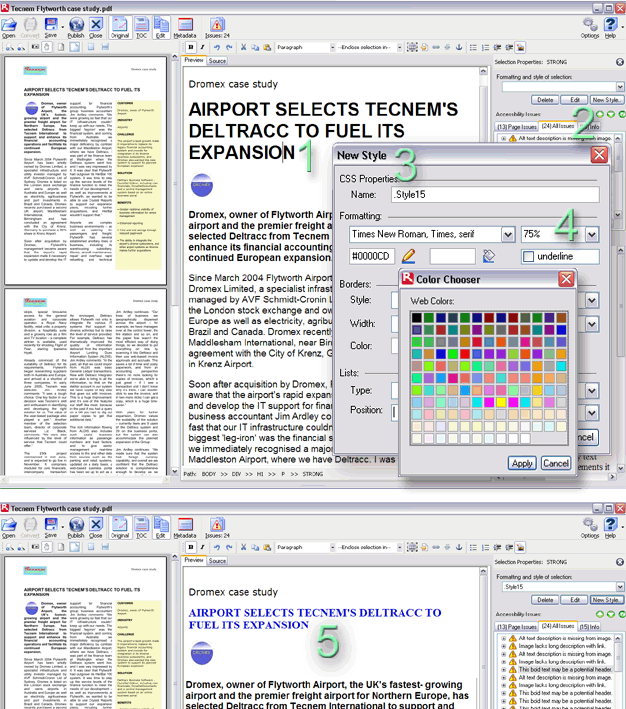
Suppose you have converted the document shown in Fig. 11, and want to modify the main heading by giving it a serif font at a smaller size, in dark blue.You
- Select the heading you want to change by placing the cursor within it – with CSS edits, there is no need to drag-select the entire heading.
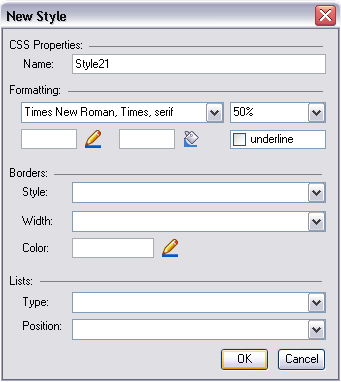
- Click the New Style button.
- The New Style dialogue box opens. (see new style image below)
- Set the new font as Times New Roman, size 50%, and pick a colour by clicking the Color (pencil) icon and picking a colour in the Color Chooser.
- Click OK.The heading is now smaller, blue, and has the serif font.

A new style, Style21, has been created.
Fig. 11: Editing text via CSS

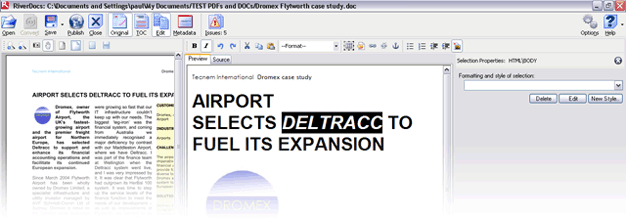
Suppose you only want to format a single word in the heading, for example, to emphasise the trade name Deltracc.
You simply select it as shown and click the I button. This will apply the HTML <em> tag to the selected word.

Editing commands
Use these key commands when editing converted output in the Editing pane
Deleting: Use the Backspace key to delete all page elements. Place the cursor to the right of the element or on the start of the next line, then press Backspace.
To delete a selected CSS style (not the element itself), use the Delete button in the CSS editing pane.
To insert a paragraph return: Press the Enter key. This inserts end and start paragraph tags in the HTML code.
To insert a line break: Press Shift+Enter. This inserts a linebreak tag in the HTML code.
