Help accessibility issue in an image
Fixing an accessibility issue in an image
Let's look at how you fix an issue – for example, the one reading “<img> missing alt text”. The alt text is the short description of an image that displays when you mouse over it in the browser. The screenreader applications used by visually impaired users read these alt texts.
The accessibility principle behind alt text is that all images should have text equivalents in order to make the page intelligible via screenreaders.
During conversion, when the Converter detects missing alt texts it automatically searches for image captions and inserts these as alt texts if they are analysed as suitable. Where no suitable caption is detected, an accessibility issue warning for missing alt text is displayed. You need to insert alt texts for those images. Even invisible images such as transparent GIFs used as spacers, or coloured shapes used only for layout purposes, should be given an equivalent such as alt=" ". RiverDocs provides a Decorative image option to insert such blank alts.
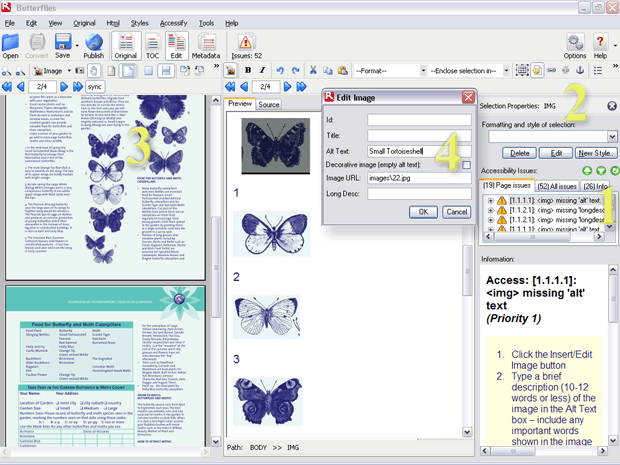
After conversion, when you click the Issues button the Converter displays the Editing view pane, the Properties pane and the Accessibility Issues pane. The Original view pane, which is also open (on the left of the screen in the example illustrated below), facilitates editing in some cases by making it easier to view an image alongside its associated text. In our example, for clarity we have also used the Zoom in button to focus on the relevant paragraph.

Fixing an accessibility issue in an image (see steps below)
To correct the first alt text issue, you
-
Click the issue warning
<img> missing "alt" text”in the Accessibility Issues list, which highlights and selects the relevant image in the Editing pane. In this case, it is the first in a group of butterfly images. - Click the Insert/Edit Image button (or press Ctrl+G).
The Edit Image dialogue box is displayed. At this stage, the Image URL box displays the location and filename of the image, but the Alt Text box is empty. - Decide on a suitable alt text by reading the relevant part of the document – in this case, the paragraph of text for image 1 tells you that the butterfly is a Small Tortoiseshell. As the text describes the butterfly’s habits rather than its appearance, the name will be sufficient as an alt text, especially as it is so descriptive.
- Enter the name, “Small Tortoiseshell” in the Alt Text box.
Any important words depicted in the image should also appear in the "alt" text description. If you wish to write more than 150 characters, you can create an HTML page containing a longer description and enter its URL in the Long Desc text box – but do not omit the alt text.
You have now fixed the alt text issue. You use a similar procedure for all the other warnings involving missing text properties.
To ensure full accessibility compliance, it is also recommended that you inspect the other images – those that did not generate warnings – during the editing session to verify that the automatically inserted alt texts are suitable.
You can verify your changes by clicking the Update button,  or pressing Alt+F10, which runs a fresh web accessibility check on the converted document by re-testing it against the WCAG 1.0 rules. Usually, the number displayed will decrease by one for each issue that you fix.
If you have introduced any new issues accidentally while editing, clicking this button also adds those to the list, so the number may increase! In such cases, new warnings will also display. Sometimes a new alt text is not suitable and the issue warning persists – for example, alt texts containing filenames or exceeding 150 characters in length will trigger accessibility warnings. However, if you have added text correctly, issues you have fixed should now no longer appear on the Accessibility issues list. After clicking the Update button you should therefore see that the numeric display on the Issues button shows a lower number of issues than before you began editing.

