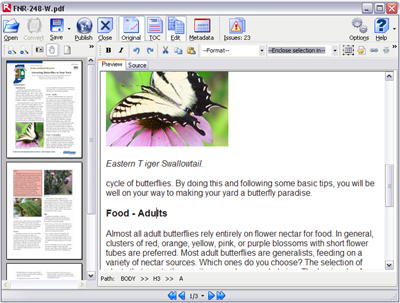
Editing toolbar
Editing text
Navigating through your document
To navigate through the document, use the Navigation controls at the bottom centre of the screen. To page through your document, click the blue arrows, or click the double arrows to go to the first or last page. You can also type the page number you want in the text box and press Enter to go to it directly.

Path display
The Path display at the foot of the Editing pane displays the HTML element that is currently selected by the cursor, showing its position in the HTML structural hierarchy. In the example shown, the H3 heading “Food – Adults” is selected. In the example shown, the H3 heading “Food – Adults” is selected. As well as enabling you to pinpoint elements quickly during editing, you can click each element shown in the path to select it instantly on screen. Note that the path ends with >> A because the Converter encloses a section identification anchor in each heading tag pair during conversion – these anchors are removed automatically when the document is published. They do not affect any CSS or other edits you make to the heading.

Using the Editing toolbar
The Converter provides extensive HTML editing options for text and other HTML elements in the Editing pane via the Editing toolbar at the top of the Properties pane, above the Preview and Source tabs. Many of these will be familiar to users of wordprocessors and text-editing applications. They are combined with options such as the Format drop-down list which apply primarily to HTML structure. You can also drag and drop selected text and other elements to different positions.
Using the CSS Editor
To make other changes, such as font, font size and colour settings, you use the group of CSS editing controls below the Selection properties display to edit the CSS styles of elements that you select in the Editing pane.
The Formatting and style of selection drop-down list allows you to select from a list of available CSS style classes. By selecting a section of the output and clicking the New Style button, you can apply the new style to that section and modify its properties, including text colour and background colour.

Each time you add a style change, the resulting CSS class setting is added to the list of style options and given a unique number, e.g. .Style 21 , and they become part of the document’s HTML code when you save it. Note however that the Converter does not retain added CSS class settings for use with other documents.
Editing HTML selectors
You can also edit HTML selectors directly by selecting them in the Path display. This enables you for example to select a paragraph (<p>, or P in the Path display) and give it a new CSS style that will propagate instantly to other paragraphs throughout the document.
The procedure is the same as for adding new styles to selected text, except that in the New Style dialogue box you enter the name of the selector, e.g. p, without a dot prefix, angle brackets or other additions. The resulting style will be added to the Formatting and style of selection drop-down list and can be edited subsequently.
For maximum document accessibility, you should only use CSS classes to convey semantic (significant) information. If text is coloured red to draw attention to its importance, you should rename the class “important”.
You have the option to rename, or delete, one or all instances of a given class name. If you choose to rename the style, the change will be applied to every page in the document, including pages you have edited already.
You can view the effect of your changes in the Preview tabbed page of the Editing pane, and you can examine and edit the corresponding underlying code by clicking the Source tab.
